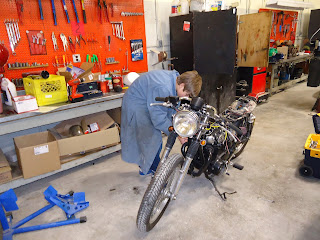
With a completion date of March starting to loom in the not-so-distant future, and with kids busy with hockey and other activities, Mr. S has come in solo to complete the rest of the wiring. A tedious job, but thanks to Mr. Gugin and some of his testing equipment, some stubborn questions have been answered, and the bike is now wired. Working on 2 or more wiring diagrams was bound to be difficult, but Mr. G's experience sure helped out.
We were also able to benefit from a really cool hydraulic pipe expander that Minnedosa Collegiate has in their shop. The Dime City Cycles muffler fit too snugly with the MAC headers. A wee tweak with the pipe expander, and things now slide on and off with a near-perfect slip fit. A clamp is next, and the final step will be to weld a muffler mount to the frame.
After that it will be a mad rush to tear the bike down for powdercoating, paint, and final assembly. More pics to follow after the Christmas break. Stay tuned!
Thursday, December 19, 2013
Wednesday, December 11, 2013
Christmas homework
As promised, here is a pic of the beautiful welding done by our supporters, Cycleboyz in Brandon.
 This is a stainless steel muffler mount, fabricated and welded onto our muffler donated by Dime City Choppers. As you can see, the welding quality and general workmanship is superb. Thanks Cycleboyz! Check out their shop and some of their projects via the link on the right.
 Just in time for Christmas, now that the mechanical and electrical work is being completed, we need to starting thinking about the aesthetics of the machine... the color combinations, including the frame, swingarm, tank, and tail section. Based on suggestions that come forward, we might vote, we may draw out of a hat... who knows? Mr. Sheppard spent lunch hour sketching/tracing the side profile you see to the left; some work with some pencil crayons and/or markers and we should have some good ideas!


Monday, December 9, 2013
A bit of "dirty work"
The new Dime City Cycles muffler fit quite snugly onto the MAC header... to snugly, in fact. One of the necessary jobs was to remove the surface coating from the header (some sort of black, super-hard paint) to see if this would be enough to allow the muffler to slide one. First step is to remove the headers...
 Like a lot of these rebuild/restore projects, parts need to be installed and removed several times during the build. I've lost count regarding the exhaust system!
 We borrowed an angle grinder with an abrasive wire wheel to remove the header coating. Even with this tool, it took quite some time to get paint off. We will need to wait to see if this is sufficient to install the muffler... while this was going on, Cycleboyz were doing their usual tig-welding magic on the muffler. Being built in stainless, a muffler mount needed to be welded to the body of the muffler for us to fabricate a mount. As usual, their workmanship was stellar and they didn't charge us anything. Thanks yet again, guys!
There is still some work to do regarding the wiring system. Now that all the indicators work, headlight, tail light, etc.... we are getting some sort of short somewhere that is blowing fuses! Looks like we need to tear into the wiring harness to find the culprit. It will give us a chance to review the original schematic to search for faults.


There is still some work to do regarding the wiring system. Now that all the indicators work, headlight, tail light, etc.... we are getting some sort of short somewhere that is blowing fuses! Looks like we need to tear into the wiring harness to find the culprit. It will give us a chance to review the original schematic to search for faults.
Wednesday, November 13, 2013
More Progress
A few more pics as the bike continues to develop...
 It still looks disorganized, but the wiring does work as it should. We still need to properly trim the aluminum seat pan... it has just been rough-cut for now.
 Tail light and turn signal bracket loosely mounted. Licence plate will go underneath the tail light, acting as a pseudo-fender, and will be illuminated by a clear window in the bottom of the tail light.
 Front end. We will be removing the "gaiter" style fork boots and running with a traditional setup. With the lowered front end, they are too long and sit distorted on the forks. This will allow a clearer view of the front turn signals as well. These still need to be wired in, along with the rear brake pedal, and perhaps a neutral light if we can find a suitable light.


Thursday, October 24, 2013
Back at It
Now that school is back in full swing, the TCS Kids' Cafe is back working on the XS650. Over the course of the summer while the bike was hanging out in Mr. Sheppard's garage, a few templates were made in order to accommodate the frame modifications, as well as mount the rear taillight and turn signals. Starting with cardboard first, the goal of this session was to create the finished pieces out of aluminum.
 Using the cardboard piece as a guide, we began measuring cut, fold, and drill marks in the aluminum.
 During the course of this process, we used some of our mental math skills, and discussed the relative ease of working with the metric system. "Half of 40mm", is far easier to calculate in our head compared to "half of 1 and 5/8 inches"!
 Starting with pilot holes, the students drilled out the various mounting points for the tail light brackets, frame mounts, and turn signals.
 We also discussed how it is far easier to mark, punch, and drill holes (pilot holes or finished holes) on a piece you are working on prior to final finishing or bending.
 The aluminum sheet we used for the battery and fuse box mount was a bit thicker than the taillight bracket -- like most shears, the material is cut by stepping down on a foot bar to operate the cutting edge. The students needed a bit of "help" from Mr. Sheppard... both girls were too light to cut the material!
 The tail light bracket on left, with the cardboard template on the right. The larger "keyhole" needs to be finished later; the wiring for the tail light passes through the material at that point.
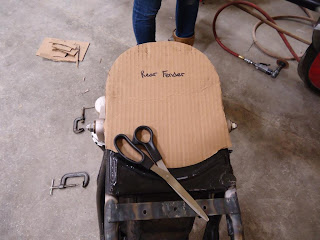
 One hour's work: the tail light bracket is 90% complete, and the battery bracket has been roughly cut out. Final finishing will be done once it is test- mounted to the frame. Note the cardboard template... irrefutable proof that Mr. Sheppard (occasionally) eats Froot Loops.


Saturday, September 14, 2013
Some pictures...


The bike will be heading back to the MCI shops shortly. A few tabs needed to be welded on -- one for the rear brake light switch, and one for the rear brake pedal return spring.
Monday, September 9, 2013
September Startup
I'll be adding some pictures shortly of some of the work that was performed over the summer break. The rear seat loop had to be finished. Mr. Sheppard tack-welded the old loop into place, to test the concept. The bike was dropped off at Cycleboyz (check out the link to the right) for "proper" welding. The frame needed to be sleeved, with a rosette weld and seam welds holding the loop on... and that was after custom-bending the 7/8" tubing to match the seat hump. As usual, the workmanship was impeccable, and once again, Cycleboyz donated their time and material to the project. An amazing group of people!!!
Speaking of donations, Mr. Sheppard got an email from Dime City Cycles. A real groovy bunch of folks who have been building Cafe Racers for years, and have been featured on "Cafe Racer TV". Jason Paul Michaels from Dime City has agreed to supply us with a stainless steel reverse megaphone muffler, and is throwing in some other stuff -- t-shirts, stickers, and a banner -- for the Kids Cafe Crew. Awesome. Check out Dime City Cycles at: http://www.dimecitycycles.com/. We'll add a permanent link to their page and online shop to the right.
Pictures to come shortly!
Friday, June 7, 2013
Summer Break
Due to the busy nature of June, we've decided to stop the work on the bike in order to allow students to focus on final assessments and projects. For the summer, the Cafe bike will be heading back to Mr. Sheppard's garage for storage. During the summer break, a bit of work will need to be performed... now that its running, the focus will be on finishing the safety requirements to allow it to be certified for the road, and some professional welding work is required for the rear frame loop. For both, the bike will spend a short holiday at Cycleboyz in Brandon for the welding, and while there Mr. S will grab a copy of a MB road safety form. Knowing what is expected ahead of time will prevent unforseen issues coming up when it is ready to go on the road.
Our timeline has changed, obviously. For those that are following, it makes sense to take another school year to properly finish the bike and turn out the best project we can. As such, the 2013-14 school year will be spent finishing up the cosmetic elements of the bike (which can be tremendously time consuming), having it ready to roll and raffle in the Spring of 2014.
Check back periodically over the summer, as when the specialized work is completed, updates will be posted.
See you all "full time" in the fall!
Thursday, May 16, 2013
It's Alive!
Over the course of the last few weeks, it became apparent that less and less was standing in our way of getting the bike actually up and running. This past Tuesday approached with only a wee bit wiring to finish, and some oil to be added to the engine. A fuel and a spark and by all accounts, it should go...
 Step one was finishing off the wiring. With adding fuel to the mix, we didn't want any exposed wires causing a short or a spark. Heat shrink connectors are a wonderful thing...
A final check of connectors, some fuel added to the tank (the kids did a great job rebuilding the petcocks as there were no leaks!). And we gave it a few kicks, hoping for the best. To our enjoyment (and with some surprise) the bike fired up. However a noticeable leak presented itself behind the oil filter cover. The bike was shut off and the issue addressed. We fired up the camera for start #2, and trained it on the suspect cover to detect any leaks. The (second) moment of truth...
It is alive! Nice to know that at least it runs. While there still is a weep, and a million things left to do before it can be raffled off, this is a huge step forward for us!

It is alive! Nice to know that at least it runs. While there still is a weep, and a million things left to do before it can be raffled off, this is a huge step forward for us!
Tuesday, April 30, 2013
More Wiring
With the signals working, the next step was to try to clean up the wiring a bit more.
 With some fiddling with wires, we were able to produce a spark, so at least all of the ignition components are in working order. Next we need to ensure the switches work as they should.

The next step was fabricating a proper muffler mounting strap. A fairly straightforward process, but it did require some accurate measuring and drilling to make sure the two mounting bolts lined up properly.
 Next we began the process of fitting the front seat mounting studs. Like the rear battery tray, we are going to weld in some shouldered m6 nuts into the frame rails, and then fix the front end of the seat in place. The holes were drilled and the nuts put in place; Mr. S will come in on another day and do the welding.
Finishing the wiring will be the next step. Tedious, and in fact Mr. Sheppard came in on his own a couple of evenings to work on things. Really, at times a one-person job due to the cramped nature of the bike.
 With some fiddling with wires, we were able to produce a spark, so at least all of the ignition components are in working order. Next we need to ensure the switches work as they should.
The next step was fabricating a proper muffler mounting strap. A fairly straightforward process, but it did require some accurate measuring and drilling to make sure the two mounting bolts lined up properly.

Finishing the wiring will be the next step. Tedious, and in fact Mr. Sheppard came in on his own a couple of evenings to work on things. Really, at times a one-person job due to the cramped nature of the bike.
Wednesday, April 17, 2013
Signals next
We snatched victory from the jaws of defeat. After spending most of the session flicking the turn signal off and on, we came to the conclusion that the turn signal relay was not the right type for our application. We got a "click" out of the relay, but no lights. Not knowing a lot about relays, we guessed that there might be too much resistance in the relay unit, and decided to try something different.
 While Mr. Sheppard rooted around the boxes of spares for another relay, the tailight mounting bracket was modified to accept the turn signals.
 With the signals then mounted in the bracket, and everything re-attached with the replacement relay (over 40 years old), we got ready to test again. Note the size of the turn signals. These are DOT approved. Yes, very large, but we don't want any hassle when we go to get the bike saftied. The new owner may swap them out for something smaller...
The student in the pic is grounding out the terminals on a bare part of the frame.
 Left.... got it!
 And the right one works as well! Next up, ignition system. We will search for that elusive spark, and then go about properly bundling and connecting the wires in the harness.


The student in the pic is grounding out the terminals on a bare part of the frame.


Thursday, April 4, 2013
Slow and Steady Progress
The April 2 session saw some more tangible progress for the bike project.
 A "new to us" (used) exhaust system was sourced which works better with our cafe rear sets. It is a MAC 2-1 system. We will need to fabricate a muffler mount, but everything appears to work as it should.
Next we went about tacking more of the custom wiring harness.
 Using a heat gun to heat-shrink tubing once connections have been made.
 Soldering connections. Always nice to have a second pair of hands. Watch out where the melted flux falls, as it can be corrosive on painted surfaces.
 Fitting proper battery terminal connections, as well as prepping the connectors that fit into the fuse box. Need to get everything water-tight!
 Tail/running light.
 Brake light. Whoo hoo!
To date, we now have working headlight, tail light, brake light, instrument light, and horn.
Next step is the turn signals, and finally the stator/rotor/alternator/ ignition system. Gotta get that spark!
Next cafe session is April 16.

Next we went about tacking more of the custom wiring harness.


To date, we now have working headlight, tail light, brake light, instrument light, and horn.
Next step is the turn signals, and finally the stator/rotor/alternator/ ignition system. Gotta get that spark!
Next cafe session is April 16.
Thursday, March 21, 2013
A sign of life!
Well, sort of. We had our first day of wiring work, and we met with some success. Armed with our wiring diagram, we started the process.
 What a tangled web we've weaved! Starting from the handlebar switchgear, we moved our way to the rear of the bike, which housed the battery, fuse box, regulator/rectifier, and turn signal relay.
 The other end... The first item we got to work was the horn, once we figured the switch itself was grounded to the handlebars. After turning on the main switch, we got the first "beeps".
Next we set about working on the headlights. At first they didn't work, until Mr. S remembered that the fuse box only works when there are fuses to complete the circuit! You can see the 10amp one in place to the left.
 While it looks a complicated mess, we actually got the lights to work, both low beam and high beam! However, they came on as soon as the main switch (the key) was turned on. We don't want to drain the battery, so we need to figure out how to wire in the on/off switch on the RHS handlebar switch. That will take some thinking.
 This is how we left it. Of course, when we do get everything working -- the brake light switch, the turn signals, the dash light, and a spark, we will use proper connectors, and clean the assembly up "proper". Mr. S will need to visit NAPA or some similar store to get quality block connectors to go with the blade connectors we have already. We want the assembly to look "factory" and also be reliable and watertight.
We will miss next week due to spring break, but will carry on in April.


Next we set about working on the headlights. At first they didn't work, until Mr. S remembered that the fuse box only works when there are fuses to complete the circuit! You can see the 10amp one in place to the left.


We will miss next week due to spring break, but will carry on in April.
Wednesday, March 13, 2013
Back at it
With a few more Cafe sessions missed due to busy students, and Mr. Sheppard forgetting the camera on one occassion, we had another session on the 12th of March. The main goal of this session was to finish mounting the electrical components so we could begin the wiring process.
 Here a student drills the mounting hole for one of the brackets. We have hopefully come up with a way to hide the regulator/rectifier under the seat with a sturdy aluminum mount, while still giving it enough clearance to stay cool... this component has been known to heat up a bit.
 Trying to get everything lined up square, even though it will be hidden under the seat hump, took some figuring. Hey look! This is why we learn how to divide fractions! What is half of 8 1/4"??? Fuse box will be mounted just ahead of the battery.
 Intake manifold/carb solution #3... third time is a charm. The folks at Wiseguys Choppers thankfully exchanged our radical intake with something a bit more traditional, but still utilizes a single carb. For the sake of the kids, Mr. Sheppard fabricated the custom throttle cable on his own... this was #4, and hopefully the last!
Next session, we will start to wire the bike!


Next session, we will start to wire the bike!
Tuesday, February 12, 2013
Grinding, Drilling, and Welding
We didn't have a full 2 hours today as the students scheduled had to head to the rink for hockey practice. However we made most of the afternoon, as we were able to work with some pneumatic tools to advance the project.
 Last week saw us put together the rear tail light assembly, combining parts from pre 1977 and post 1977 models. We hit a minor roadblock as the socket for the tailight bulb fouled on the mounting bracket. Some short work with the die grinder solved that. Thanks to Mr. Gugin for the use of the tool -- setting up, as well as lending the protective equipment! The light now fits in the bracket so we will reassemble the parts to test fit next time.
 Next we needed to drill holes to set nuts into the frame rail, in order to mount the aluminum battery tray/fuse holder/fender. Mr. Sheppard had taken the cardboard cutout and fashioned an aluminum equivalent, which you can see on the edge of the workbench. We need to drill...
 Locate the nuts in the holes (shouldered nuts work great here...)
 And then weld them in place. Note that not a lot of filler is needed, as these really aren't load-bearing nuts. The bolt on the left hand side was used to ensure the nut was square to the frame. Once everything is cooled, we will remove the bolt, and then use a die to chase the threads to make sure they will work with the appropriate bolt. Much better than aluminum riv-nuts, which are another option.
 Finally, the boys get a look at the wiring diagram. It looks complicated, but with some patience and trial and error, it will work. Big thanks to xs650.com forum member "jayel" from Southwestern Iowa, who made the diagram for us to use.
 Last week saw us put together the rear tail light assembly, combining parts from pre 1977 and post 1977 models. We hit a minor roadblock as the socket for the tailight bulb fouled on the mounting bracket. Some short work with the die grinder solved that. Thanks to Mr. Gugin for the use of the tool -- setting up, as well as lending the protective equipment! The light now fits in the bracket so we will reassemble the parts to test fit next time.


Wednesday, February 6, 2013
Back at it
January has been a bit of a hit-and-miss month with the project, as many of the students are also involved with basketball and curling, both of which also fall on Tuesdays. The start of Februrary sees these activities wrap up, so kids are become more available to continue working on the bike.
 A bigger job for this session was stripping the wiring harness in order to start from scratch. As mentioned previously, the entire bike will be re-wired, from scratch, mating 40-year old handlebar controls with a modern ignition system, regulator/rectifier, and blade fuses. Took almost the entire session, but with patience, the harness was stripped and we should have enough wire (in the right colors) to connect all the component parts.
 Part of what makes a Cafe bike "trick" is to create the clean look. The advantage of our seat section is that some bulky parts, like the batter and other components, can be hidden under the seat hump. First step is to trace... you can see the student in the background utilizing some scrap cardboard and a steady hand.
 And then we cut! This piece will be traced onto an aluminum sheet and cut out. It will act as a inner fender, as well as allow a spot for the battery box to be mounted, and will also provide some "real estate" to mount the fuse box and perhaps the regulator/rectifier.
 While this was going on, another student worked on the front end of the bike. The top triple clamp needed to be removed and the new headlight ears installed onto the forks. Once done, this allowed the front end to be finished up in terms of the front suspension.
 Once done, we are mixing and matching some parts for the rear tailight. We didn't finish it during this session (we need to modify a bracket), but we think we've come up with an acceptable way to mount the tailight to the bike.


Subscribe to:
Posts (Atom)